 |
| May 03, 2016 | Volume 12 Issue 17 |
Designfax weekly eMagazine
Archives
Partners
Manufacturing Center
Product Spotlight
Modern Applications News
Metalworking Ideas For
Today's Job Shops
Tooling and Production
Strategies for large
metalworking plants
Injection Molding Tips:
6 ways to cut machining costs
By Gus Breiland, Customer Service Engineering Manager, Proto Labs
Incorporate a few of these design and material considerations to reduce your machining expenses.
Machining gets a bit more complex every year, and as a result, it can be challenging to keep pace with the dos and don'ts of part design. But lowering the cost of machined parts while improving functionality can still be achieved by a few relatively simple adjustments to your part design or material selection.
At Proto Labs, we use automation software to quote parts and highlight features that need design attention. The software will catch features that are unmanufacturable up front, but it will also highlight areas that do not necessarily require change, but can improve the design's overall machinability -- thin walls, engraved text, deep holes, and complex geometries, to name a few.
Here are a few tips to help you design more cost-effective machined parts.
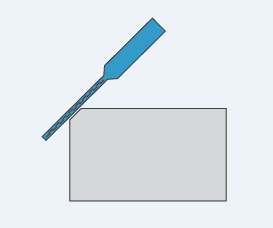
1. Provide relief to corner pockets
Consider the corners of a machined pocket -- the inside of an electronics housing, perhaps, or a bracket used to capture the body of a rectangular component. One common design oversight is leaving the intersection of the vertical walls on those part features perfectly sharp. To illustrate, think about machining a stainless steel box to hold a collection of baseball trading cards. The only way to get the perfectly square corners needed to fit those Babe Ruths and Hank Aarons is with electrical-discharge machining (EDM), a slow and expensive process.
Instead, we'll equip one of our machining centers with the smallest end mill available to clean out the corners. In 304 stainless steel, that means a 0.031-in. (0.8-mm) end mill, which leaves a corner radius of 0.016 in. (0.4 mm). That's pretty sharp, but the depth is limited -- the length of most steel-cutting end mills in this size range maxes out at five times the cutter diameter, barely deep enough to fit your favorite center fielders. Machining with small end mills such as this is also slow and delicate work, driving up the cost of your project.
A more budget-friendly approach is machining a relief in each corner of the pocket. This removes that pesky radius, leaving a U- or C-shaped clearance instead (see illustration). It also allows for far deeper pockets -- by cutting a 0.25-in. (6.35-mm) -wide relief in each corner, functionally sharp corners to around 1-1/4 in. (32 mm) in depth are possible. And by switching to aluminum or even plastic, pocket depths twice that of steel are possible. Best of all, designing pockets in this manner reduces part cost, since larger end mills can be used and material removal rates increased accordingly.
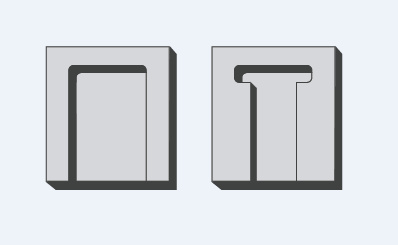
The left image illustrates resulting corner radii from milling. Consider adding reliefs to sharp corners (right image) to improve fit.
2. Deburr edges yourself
Avoiding corner breaks is another radius-related, cost-cutting measure. In an attempt to remove burrs and break sharp corners, designers will often smooth external part intersections with chamfers or corner radii. It's understandable, and sometimes quite necessary, but it can also be expensive. With stainless steel parts, we provide an automated deburring option, but all other materials are delivered as-machined. If the part design calls for an edge break, we have to call up an additional tool (a ball end mill) and machine these corners using a 3D-profiling motion. We generally run these tools at very high rpm, and very small amounts of material are removed, but it's still a lengthy process to go back and forth until each corner is smooth. Many customers opt to save a few bucks by deburring these parts on their own with a file, some abrasive paper, or a buffing wheel.
Adding chamfer or radii to corners can create longer machining times due to ball end mills.
When an edge needs softening, use a file or deburring tool to break the edge instead of milling it.
3. Avoid text until molding
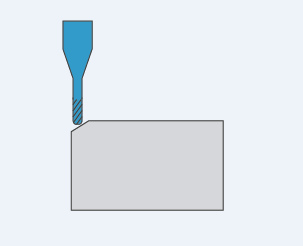
Similarly, text engraving is an aesthetically pleasing but time-intensive operation, one that might be best to avoid if possible. Here again, a ball end mill is used to trace whatever letters, numbers, and symbols are called for on the CAD model. It looks cool, and might be a valid requirement on your machined part, but is probably more appropriate on injection-molded parts, where additional machining time is amortized over higher part volumes.
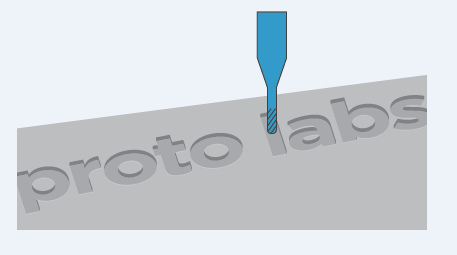
Small tool diameters add machining time, so consider removing text or logos from machined prototypes.
4. Be cautious of thin walls and features
Our standard part tolerance is +/- 0.005 in. (0.127 mm). If you have a feature that is 0.020 in. (0.05 mm) or smaller, our automated quoting system will highlight it as a thin-wall geometry, but keep in mind that we'll still allow it to be machined -- so the machined part may differ slightly from your original design. Any thin walls that are 0.020 in. or less are not only subject to breakage during the machining operation, but may flex or warp afterward. Beef them up as much as your part design allows.
5. Keep it simple
Very deep pockets are a no-no, even if the corners are relieved. Not only does it take a lot of machining time to remove all that material, but any residual stress in the raw material tends to show its ugly face as pockets get deeper and walls taller. Gussets or support structures might be used to support these workpieces and prevent movement due to stress, but these tend to increase machining costs. "Keep it simple" is the best advice for any manufacturer or product designer of machined parts.
The same principal applies to overall part geometry as well. Don't attempt to make parts do more than they should. Maximizing material usage may create workholding or machining problems, in turn increasing costs. If the design gets too complex, consider breaking it into multiple components and using fasteners to assemble them. No one likes assembly costs, or the complexity that goes with multiple pieces, but it might be the best approach for difficult-to-machine parts. Sculptured surfaces, cavernous slots (think heatsinks), super deep holes and threads -- these are some of the common machining cost drivers that can chip away at your project budget.
6. Explore alternative materials
One of the simplest ways to stay within budget -- assuming it meets your requirements -- is by switching to a more machine-friendly or less expensive material. Our material selection includes a range of metals and plastics, each with its own engineering attributes, aesthetics, machining considerations, and material cost.
- 17-4 PH stainless steel is a bear to cut. If high strength and corrosion resistance isn't critical, try 316L or 304 instead.
- Copper is a great electrical conductor, but it's far more expensive than aluminum, which is nearly as conductive and easier to machine besides.
- If hardness is a concern, 4140 might be your first choice, but 1018 is very low cost and takes an admirable case hardening.
- And one sure way to make a machinist smile is to give him or her an order for some brass or magnesium parts -- both are free machining, and might just have the mechanical and chemical properties needed for your application.
- On the plastics side, we have nearly three dozen to choose from. All of them are relatively easy to cut, a factor that often -- but not always -- equates to lower cost parts. Some plastics offer superior wear, corrosion, or chemical resistance, others perform well under heat or flame, while still others offer excellent strength, impact, or electrical properties.
There are too many metal and plastic options to list here, but feel free to check out the complete material list or call one of our customer service engineers for advice.
When you upload a CAD model to our website, our quoting tool calculates what can be machined, what's iffy, and then rejects the rest. Its conclusions are clearly spelled out in the quote, giving you a chance to adjust the part design if so desired and spin the quoting wheel again. If you're ever in doubt, however, give us a call at 877-479-3680. We're happy to answer any design questions you might have to help you save a few dollars.
Published May 2016
Rate this article
View our terms of use and privacy policy